
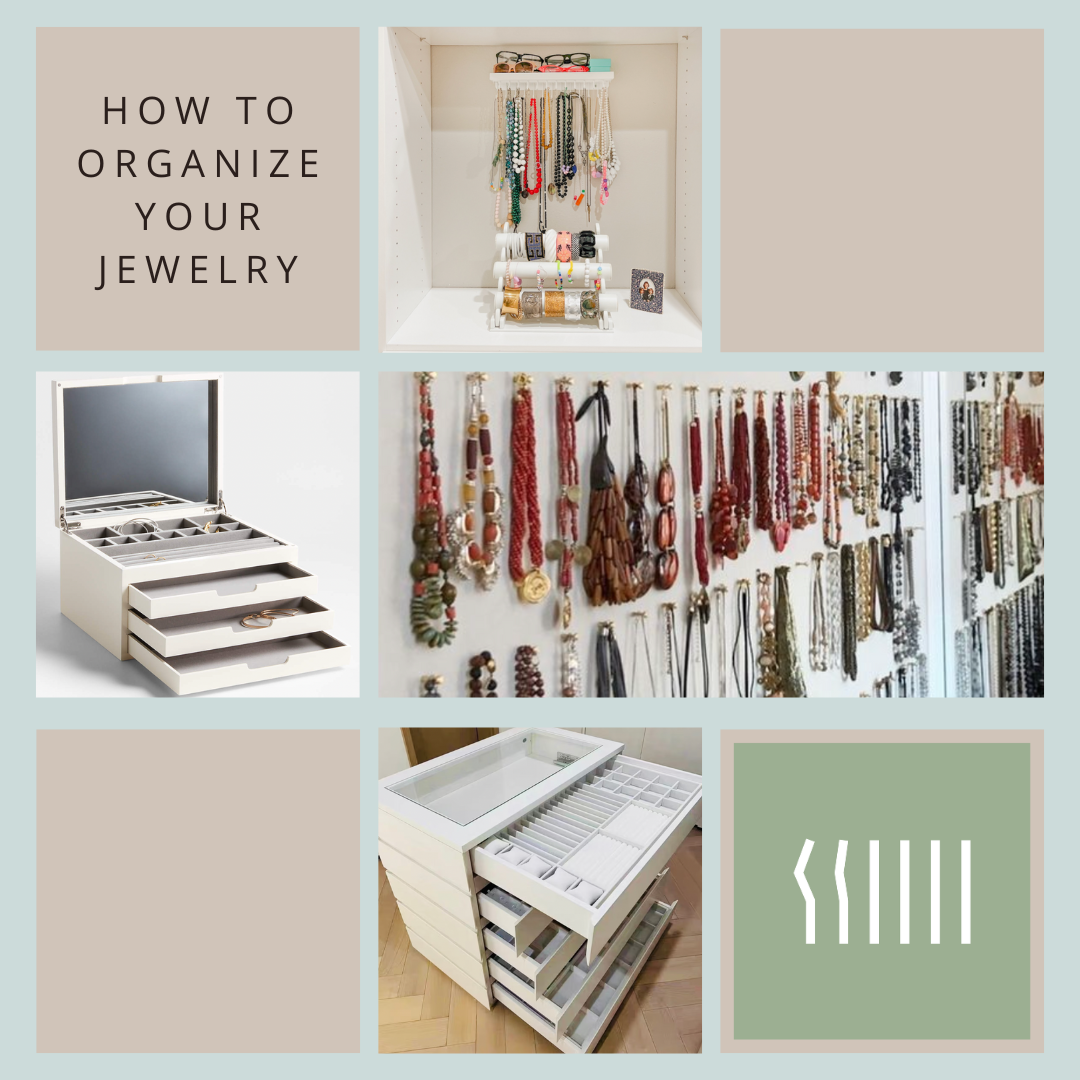
How to Organize Your Jewelry (and Actually Keep It That Way)
Jewelry is very challenging to organize. Period. Take it from a professional organizer and jewelry lover - I have tried countless systems that inevitably fall flat. Tangled chains, missing earrings - it all can turn into a jewelry soup in no time (and my guess is if you own jewelry you already knew that!) Here are a few ways I recommend storing jewelry for my clients. Since all of our spaces — and collections — are different, I hope one of these ideas might be the right fit for you.
First things first: Declutter
Before you can organize your jewelry, you have to know what you actually have. Start by pulling everything out — every last earring, bracelet, and pendant — from wherever it might be hiding. Check your jewelry box, bathroom counter, dresser drawers, purses, travel bags, the junk drawer, even the home safe. It’s amazing how far jewelry can migrate!
Lay it all out on a flat surface so you can really see the scope of your collection. Then assess:
Toss any earrings missing their mate.
Set aside anything that looks dated or tired for donation or resale.
Keep and clean what you love and wear.
If you have silver pieces that need attention, give them a quick polish with a silver cleaning cloth — or better yet, make a small pile to take to the jeweler for professional cleaning and polishing. Bring along anything that needs repair or resizing while you’re at it. Nothing’s sadder than a broken clasp on a favorite piece that could easily be fixed.
Once you’ve edited, tidy things up so your favorites are visible and at the ready. You’ll be amazed how much easier it is to enjoy your jewelry when you can actually see it all in one place.
Next: Categorize
Something I notice in many homes is that jewelry often falls into more categories than just “everyday favorites” and “special occasion pieces.” Taking a few minutes to sort your collection this way can make it so much easier to find what you need and actually wear what you love.
Here’s a simple way to break it down:
Everyday Jewelry: The pieces you reach for without thinking — studs, hoops, your favorite necklace, or that ring you never take off. These deserve the most accessible spot.
Special Occasion Jewelry: Dressier or statement pieces that you wear less frequently but still want within reach. These can be stored slightly out of the way, maybe in a box or drawer insert.
Sentimental / Doesn’t Fit: Family heirlooms, keepsakes, or items you love but don’t wear. Store these in a safe or a small box tucked high on a shelf — they hold emotional value but don’t need to occupy daily space.
Costume / Holiday / Vacation Jewelry: Fun or seasonal pieces that you pull out occasionally. Keep these grouped together in a labeled box so they’re easy to find when the moment strikes.
It’s lovely to revisit your sentimental or seasonal pieces now and then, but they don’t need to live front and center with your everyday items. Think of this as curating a collection that reflects how you really live and dress right now — with room to evolve.
Storage Options:
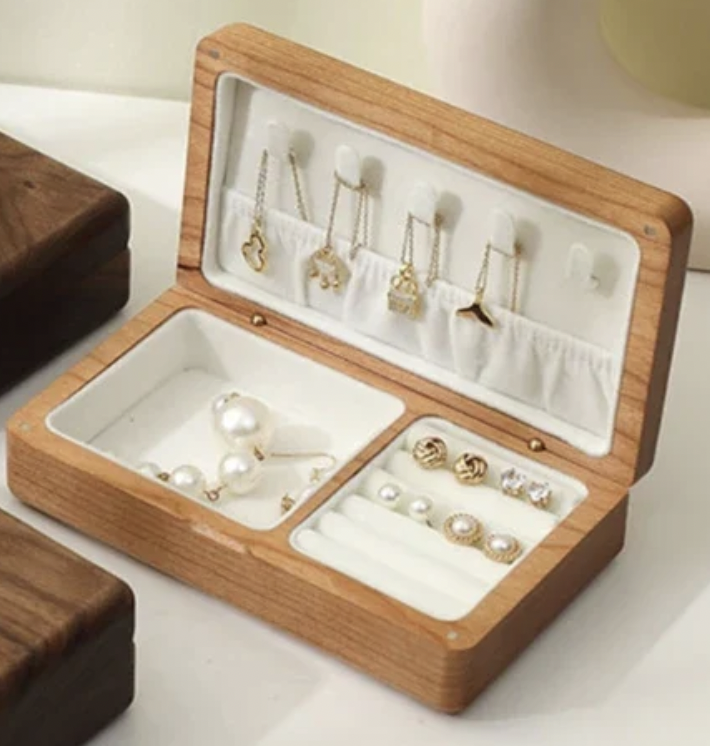
Option 1: The Classic Jewelry Box

This gorgeous jewelry box from Wolf plays Sleeping Beauty!
They’re cute, nostalgic, and oh-so-satisfying with all their little compartments. Jewelry boxes come in every material imaginable — wood, woven, lucite, even the kind with tiny spinning ballerinas — but are they right for you?
For a modest collection or dainty pieces, a jewelry box might be perfect. But if you love chunky statement necklaces or have a large collection, finding one big enough can be tricky.
Pros: Pretty, nostalgic, lots of compartment options, keeps small pieces from tangling.
Cons: Often too small for larger collections, takes up counter space, can lead to “jewelry soup” if not well-organized.
Pro tip: If a traditional jewelry box feels too small or fussy, try using a low dresser or console table and arrange a few open trays or small boxes on top. It gives you the same organization but feels more open and integrated into your space. Just keep in mind that open trays can become magnets for random clutter, so a little daily tidying helps keep your setup looking intentional.
Option 1B: The Tiny Jewelry Box
For so many of us, jewelry habits are simple — we wear the same few pieces almost every day (me included!). In that case, a small jewelry box might be all you really need. These petite boxes are perfect for holding your daily staples like a few rings, earrings, and a necklace or two.
They tuck beautifully onto a nightstand, vanity, or bathroom shelf, and can even travel easily if you like to bring your favorites on the go.
Pros: Compact, portable, easy to tuck away, perfect for everyday jewelry.
Cons: Limited space, not ideal if you rotate through lots of pieces.
Pro tip: Choose something you love looking at — a small jewelry box can be a lovely design moment on your nightstand or dresser. And this might sound persnickety but considering passing on those tiny boxes that zip shut. The zipper makes them great for travel but can be annoying to fiddle with everyday.
Option 2: Hang It on the Wall
If you’re short on drawer or counter space, go vertical. Hooks, racks, or pegboards can turn your jewelry into art.
This is such a great solution for so many of my clients in smaller spaces — especially for those who need to see things to remember they exist, or for the self-proclaimed “drawer crammers” where everything ends up tangled and buried. Plus, keeping jewelry up on the wall also puts it out of reach of curious little hands (or paws).
Pros: Doubles as décor, great visibility (you’ll actually wear what you see), perfect for statement necklaces.
Cons: Can look messy if overcrowded, not ideal for dusty or humid spaces.
A Note on Jewelry Trees
I generally don’t recommend jewelry “trees” or free-standing vertical holders. So many clients have asked me to donate them over the years!
They’re cute in theory and should be great — but in reality, they get tangled so quickly that they end up being more frustrating than helpful. The only way they really work is if there are just a few things hanging on them… which sort of defeats the whole purpose. Hard pass.
Pro tip: I often recommend good old clear lucite hooks or hook bars. Since the jewelry is the star, I don’t like to use anything overly decorative or fussy — simple materials keep the focus where it belongs and prevent the display from looking too busy.
Even deeper pro tip: Try using clear Command hooks at first to see if the system works for you. They’re inexpensive, removable, and a great way to experiment before committing to something more permanent.
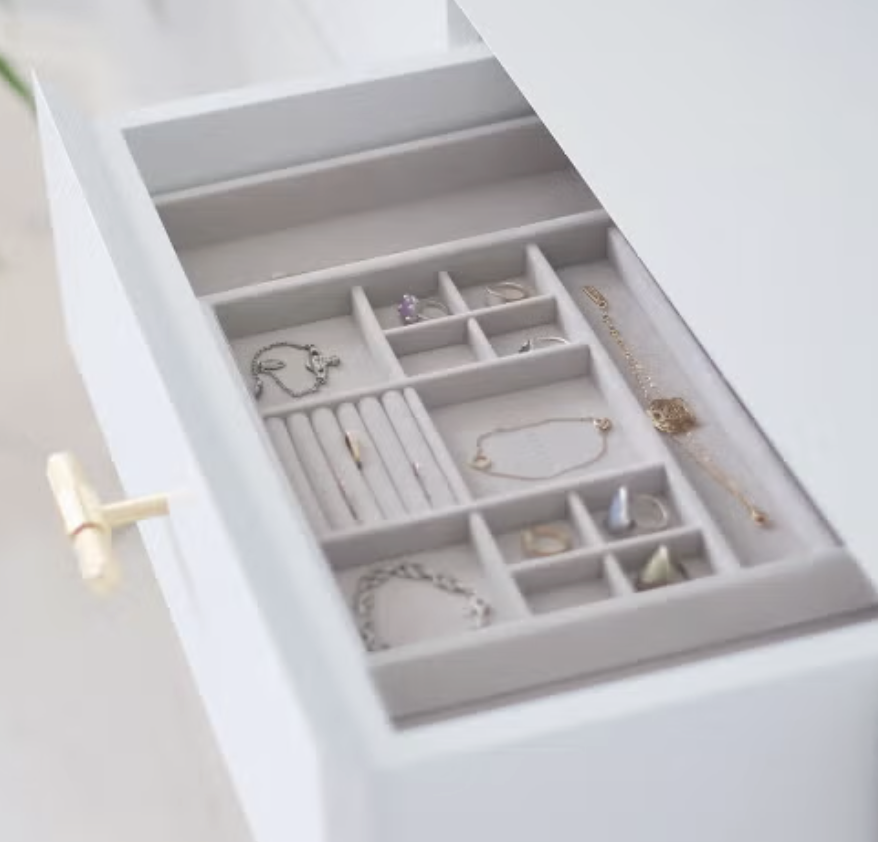
Option 3: Store in a Drawer
A shallow drawer with trays or inserts is my personal favorite setup — it feels like shopping your own little boutique every morning.
Pros: Keeps dust away, easy to access, hides clutter when closed.
Cons: Requires a dedicated drawer (and discipline not to toss things in!).
It works beautifully if you have the drawer space, obviously — but I’ve also had a lot of success creating jewelry drawers in unexpected spots like desks, nightstands, or even bathroom drawers, depending on your layout and how you get ready. It’s especially great for those very shallow drawers that aren’t good for much else.
I often recommend Stackers, sold at The Container Store — they come in so many configurations that you can truly customize your setup. It’s a bit of an investment, but worth it for the quality and flexibility. For something even more personalized, there are wonderful Etsy vendors who will make custom inserts to fit your exact drawer dimensions and jewelry collection.
Pro tip: Use modular inserts or velvet-lined trays, and always measure your drawer depth — most are shallower than you think!
Option 4: Free-Standing Jewelry Cabinet
The grown-up version of the childhood jewelry box — tall, elegant, and often with mirrors or built-in lighting, these pieces can be both storage and statement. If you have the room and a big collection, I’d absolutely consider one. I am really loving the look of this one from West Elm which has designated spots for jewelry and slightly deeper drawers for sunglasses, scarves or other small accessories.
Pros: Large capacity, easy to categorize, beautiful presence, hard to make a dumping ground for other items
Cons: Takes up floor space, can feel bulky in small rooms.
Pro tip: Consider what the dominant jewelry categories you want to store before purchasing. Lots of space for hanging chunky necklaces won’t serve you if your collection is mostly rings and earrings. This is also a great item to shop for vintage — older versions are often beautifully made, solid wood, and can add a lot of charm to a space.
Option 5: The “Art Wall” (Really Hang It on the Wall)
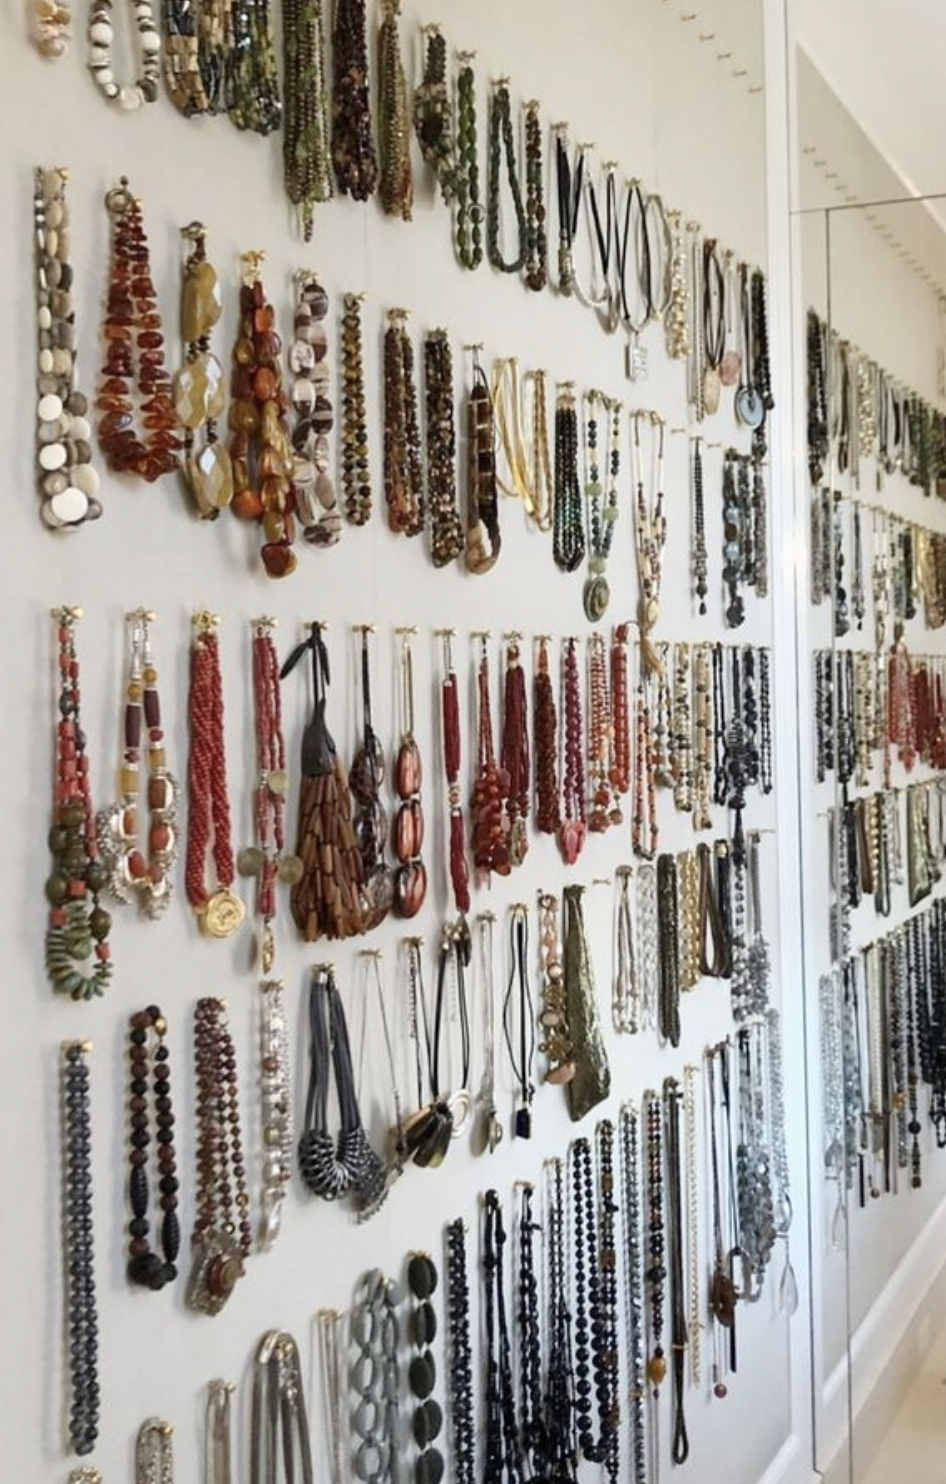
This is the high-impact, bespoke option — a full wall of tacks or hooks with every necklace and bracelet on display. It’s not for everyone, but when done right, it’s absolutely stunning.
This concept was inspired by a client project from my friends at Peace by Piece Organizing here in San Francisco (photo shared with their permission). It’s a phenomenal example of how jewelry can double as art — and what a wonderful way to truly enjoy and appreciate your treasures every day. Instead of being tucked away, each piece becomes part of your home’s visual story.
Pros: Customizable, makes a visual statement, celebrates your collection as art.
Cons: Dust, but if you rotate and edit often, it’s worth it.
Pro tip: Keep a small dish or tray nearby for the everyday pieces you reach for most.
📸 Photo courtesy of Peace by Piece Organizing, San Francisco — used with permission.
So what do you think? One last tip: organizing your jewelry isn’t a one-and-done project — it evolves. What worked last year might not work now, and that’s okay. I’m always shifting things around! Sometimes the smallest change improves the flow.
Make it about progress, not perfection. The goal isn’t to create a museum-worthy display — it’s to make it easy to see what you love, wear it often, and enjoy it every day.
Need some help figuring out your best jewelry set up? Please get in touch!
xo Melissa